Google 검색에서 거북이 미디어의 포스팅을 더 자주 볼 수 있습니다.
This posting is about how to set up Google Ad Manager which is a combination of ad server and ad network with screenshots of August 2020 version.
This is about Google Ad Manager for Small Businesses which is free version.
This posting is focused on website, not app.
So every screenshots are from websites.
What is Google Ad Manager
Google Ad Manager is a combination of ad server and Google ad network including AdSense, Ad Manager(previously Ad Exchange) for large publishers who have significant direct sales.
Google Ad Manager provides detailed controls and supports multiple ad networks including AdSense, Ad Exchange, and third-party ad networks.
AdSense or Admob may be better ad network for you if you don’t have large direct sales.
Free version – Google Ad Manager for Small Businesses
Google Ad Manager for Small Businesses is free version and allows limited ad impressions compared with paid version.
Google Ad Manager allows 90 million free ad impressions per month in the USA.
Ad impressions from Google networks including Adsense and Google Ad Exchange are completely free of charge.
When you are over the free impression limit, Google will notify you about it.
※ Google’s monthly impression limits
1. 90 million impressions from non-video ad units + 800k video ad impressions : the USA, Canada, Australia, and New Zealand.
2. 200M impressions from non-video ad units + 800k video ad impression: countries in Europe and Asia.
3. 150M monthly impressions from non-video ad units + 800K monthly impressions from video ad units for countries which are not in 1 and 2.
Paid version – Google Ad Manager 360
Google Ad Manager 360 is a paid version for publishers who are over monthly impressions limit of free version.
Google Ad Manager 360 is mostly used by big publishers with a lot of direct sales.
Google Ad Manager signup and initial setting
AdSense account is required
You need a valid Google AdSense account to sign up for Google Ad Manager.
You cannot sign up Google Ad Manager without having an AdSense account.
So if you don’t have one, create Adsense account.
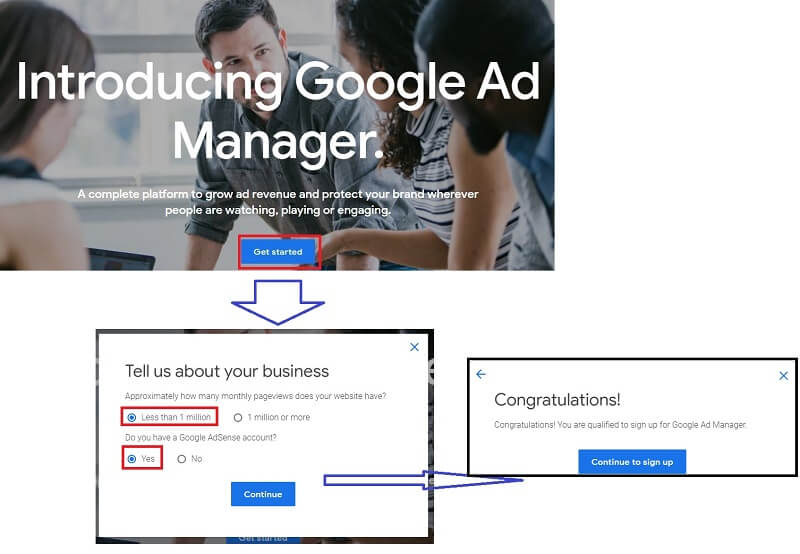
You can sign up by clicking the Get Started button.
You will be asked about monthly page views of the website after you click the Get Started button.
I recommend you to select “less than 1 million”.
If you select “1 million or more”, you need to fill out your company information prior to signup.
Initial settings : country, time zone and currency
You can’t change the initial settings after you create your first order.
Consider which currency is best for you.
Link your AdSense account
You need to link your AdSense account to Google Ad Manager. If you can’t link it then you can’t create an adsense line litem.
Google Ad Manager ==> Admin ==> Linked accounts ==> Adsense tab ==> New Adsense link
1. You need to enter the web property code whick is your Adsense publisher ID
For display, add
ca-pub-1234567890
For mobile apps, add
ca-mb-app-pub-1234567890
2. Enter the account verification details, such as the ZIP code or last five digits of the phone number associated with the AdSense.
Finishing Ad Manager link, you need to log in AdSense account.
AdSense ==> Settngs ==> Access and authorization ==> Third-party access
Find the request for your Ad Manager network and click Approve.
Now you are good to start Google Ad Manager.
If you can’t find ‘Linked accounts’ in Google Ad Manager, then ask for it to Google through Google Adsense Help Center.
Quick view on Google Ad Manager menu
You can see the below image after logging into Google Ad Manager.
‘Sales tab’ will be shown only for the publishers who are authorized to use Ad Manager(Ad Exchange) network with google
You need to contact google sales representative to have contract Ad Manager(Ad Exchange) network.
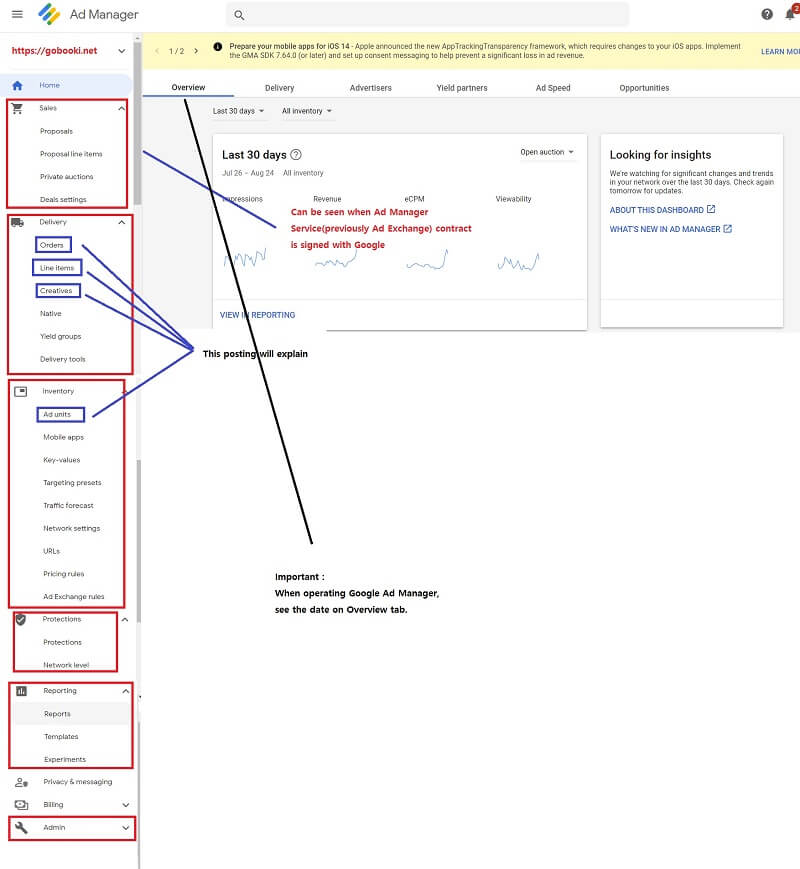
Three basic elements of Google Ad Manager ad serving

To set up Google Ad Manager;
1. set up ad unit in the area of the website or app and generate tags.
2. set up line item to deliver ads when, how, and how.
3. set up creative to show your ads on the website or app.
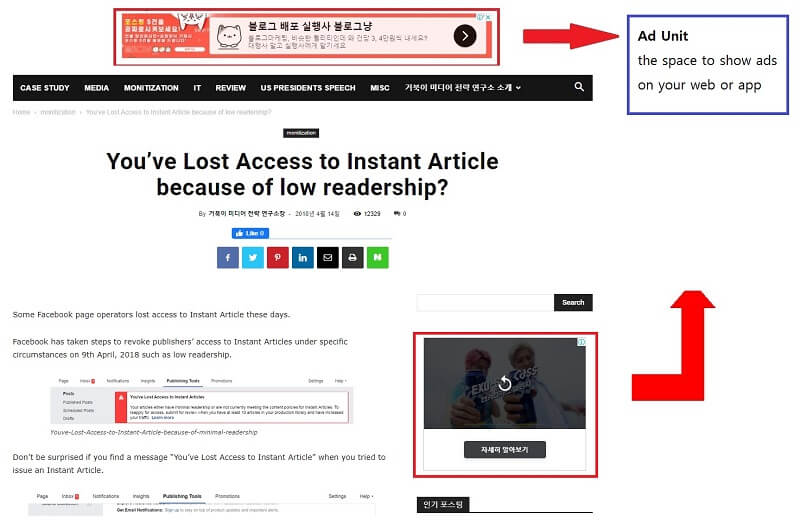
ad unit : where ad tags will be inserted
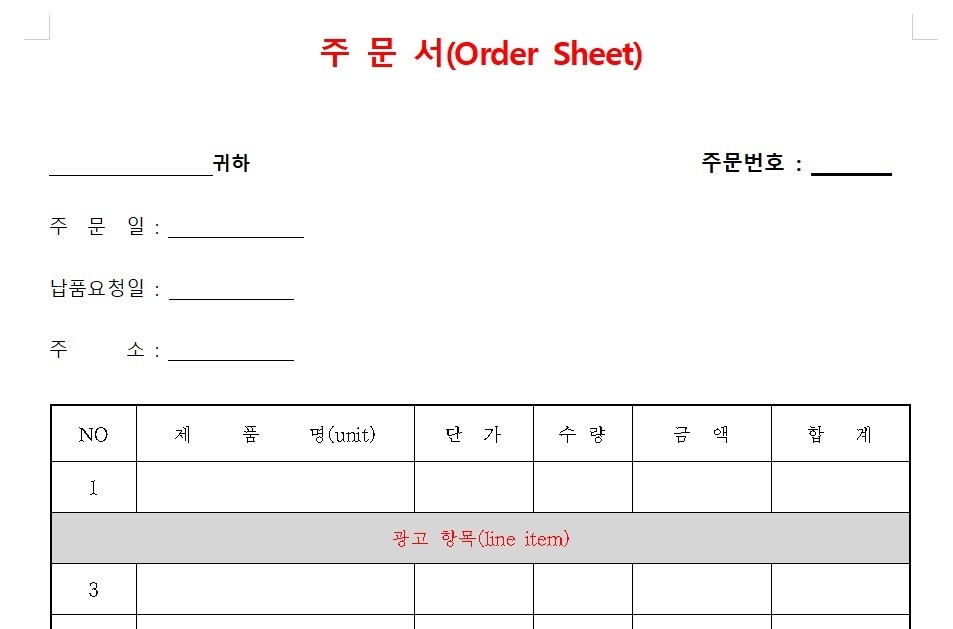
line item : details of the order from the advertiser
Line item concept is borrowed from the details of the order in restaurants.
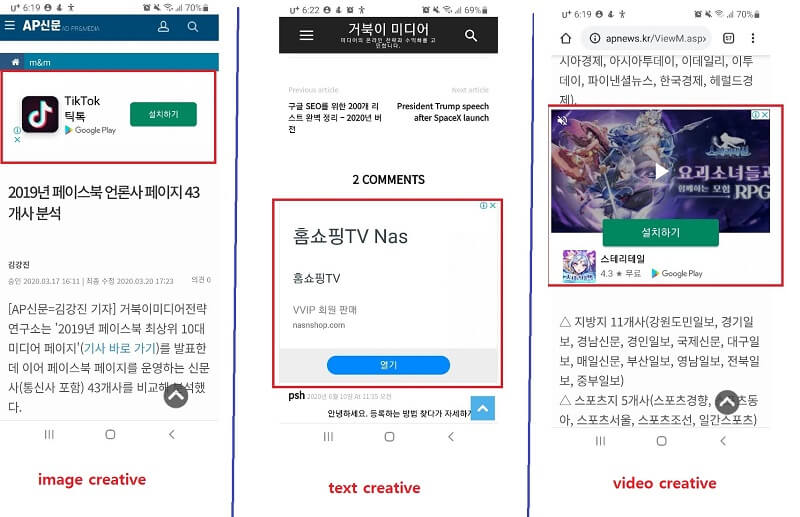
creatives : image, text and video which the user sees on the page
How to set up ad unit
Create a new ad unit
You need to create an ad unit and generate tags to set up google ad manager for the first step.
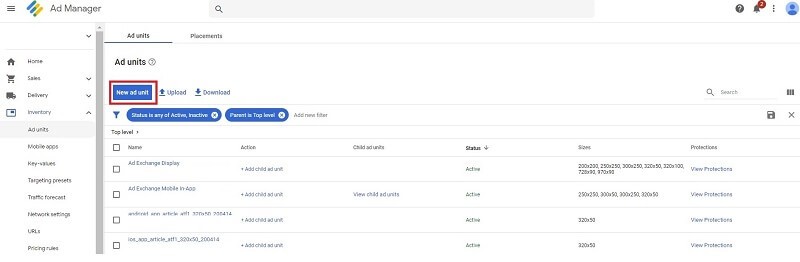
Choose inventory ==> Ad units ==> New Ad Unit.
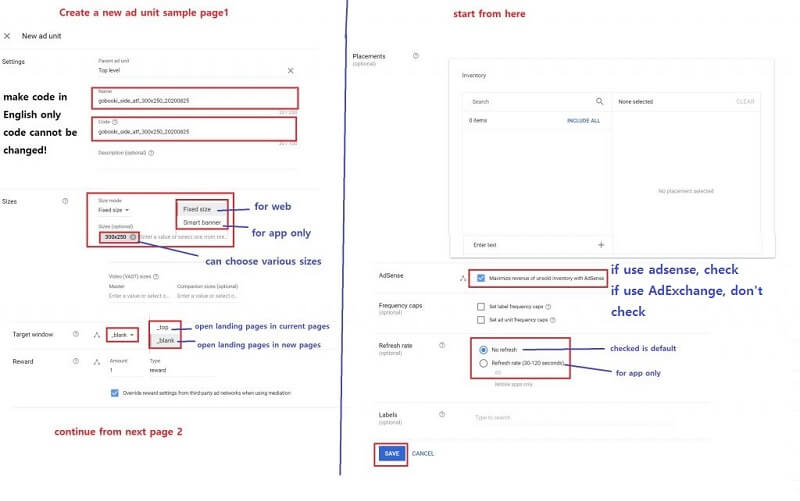
– parent ad unit as Top level : I will skip it for now. You can create ad units with up to 2 levels of hierarchy in free version.
– Name : It’s helpful to include information about the ad unit’s location. You need to put location, size, section, date of creation in the name. You can find and understand the ad unit when you search it.
– Code : I recommend you make code in English if possible. Error may occur when code is not English.
– Sizes : There are two size mode. “Fixed size” is for web and ” Smart banner” is for app. You can select one or multiple sizes for ad unit. Smart banner doesn’t have to select sizes. Google Ad Manager will automatically select best sizes for app.
– Target window : You have two options. “_Blank” is recommended. If you choose “blank”, the landing page will be opened in the new tab. If you choose “_top” the landing page will be opened in the current tab.
– Reward : It’s for app. How many rewards a user receives for watching a video ad.
– Placements(optional) : You may not need know now. A placement is a group of ad units that advertisers can target all at once
– Frequency caps(optional) : Frequency caps limit the number of times specific creatives can serve to an ad unit.
– Refresh rate(optional) : Refresh rate is for mobile apps only. This is useful for apps where users stay on one screen for long periods of time to maximize ad revenue.
– Labels(optional) : Labels can competition between advertiser or brands. For example, to prevent two different smartphone companies from showing line items together, you may categorize line items as “smartphone”.
generate tags
If you select the ad unit you just created, you can see a “line item” and “tag” tab on the top.
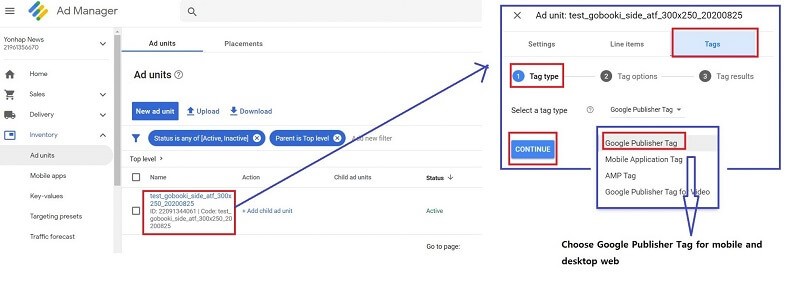
You can see tag options in the below image if you select Google Publisher Tag(GPT).

Choose Inventory ==> Ad unit ==> Tags
– Passback tags : You don’t need to create these types of tags yet. Passback tags can be used when you have contract with high CPM but low ad fill rate, usually retargeting ad network. When a third party ad network doesn’t have an ad to serve passback tags can be used to serve from your Google Ad Manager Network.
– Single request : Recommended. SRA(Single Request Architecture) calls and shows all ads in a page at one time. It can give you faster loading speed.
– Collapse empty divs: Not recommended. It’s waste of ads. Using collapse empty divs will hide the ad slot when ads are not filled.
– Page-level key-values(optional) : You can skip it. Set custom attributes across all ad slots on the page to use less code and ensure ad slots have the same targeting attributes.
– Out-of-page creatives: Yon don’t need it for now. You use it to serve pop-up, pop-under, or floating creatives .
– Live traffic : This is for live stream video.
– Sizes : You don’t have to input size here. You can see sizes associated line items are already selected
– Ad slot key-values(optional) : You don’t need it now. Key-values let you define custom targeting.

Unlike AdSense, Ad Manager has two tags codes, one for the header and another for the body of the website HTML documents.
Place the “document header tag” in the HTML header and the “document body tag” in the ad inventory section.
You can see 3 div-gpt-ad numbers in the header and body tags. Each time you issue a new tag, the number changes.
When you regenerate your tags you need to generate header and body tags at the same time.
If the 3 ad numbers don’t match, your ads may not work.
After creating ad units, the next and final step is to generate ad tags and add those tags to your website’s code. This is how you can generate ad tags:
how to set up order
To run a new ad campaign in Ad Manager, you’ll first need to create a new order.
After creating the order, you’ll need to create line items, add creatives, and approve the order before it can serve.
Click New order to start a new order or click the name of an existing order to go to its details.
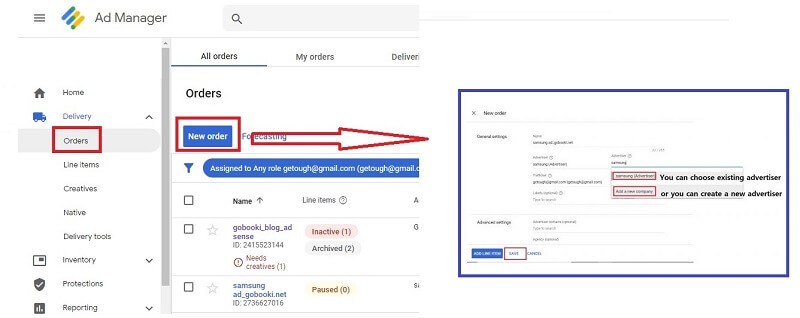
– Choose Delivery ==> Order ==> create a New order ==> approve
- – Name : The name of an order should be something descriptive about the campaign and its line items.
- Advertiser : An advertiser is the organization that wants to show an ad creative on your website or app. You can use ad networks as advertiser too. You can create new advertiser or select from the list you input before.
Trafficker : The primary person who’s responsible for managing the daily details of the line items in the order and uploading creatives.
Labels (optional) : Labels can exclude competition between advertiser or brands.
Advanced settings : I will skip it for now.
How to set up line item
You can create a line item after creating a new ad order or clicking ‘new line item’ from an existing ad order.
As the first step of adding a line item, you need to choose either the Display or Video and audio ad type. This selection in Ad Manager determines the kind of creative the line item should serve.
The blue box below is an expanded screen of options hidden by options.
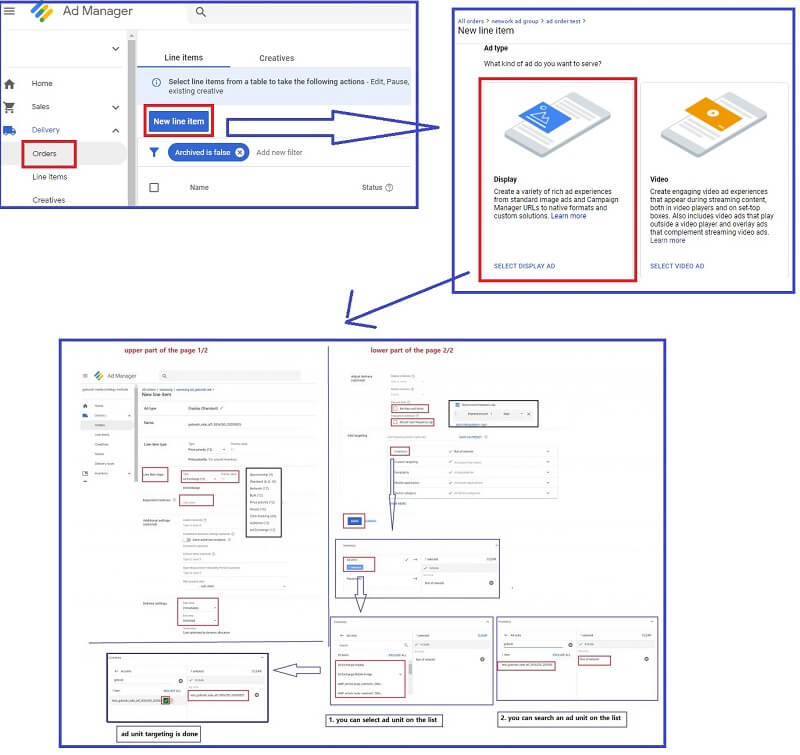
select Delivery ==> Order ==> New line item
– Ad type : Ad type defines the creative type you need to associate with the line item later. You can choose a display creative or a video or audio creative.
– Name : Make the name descriptive.
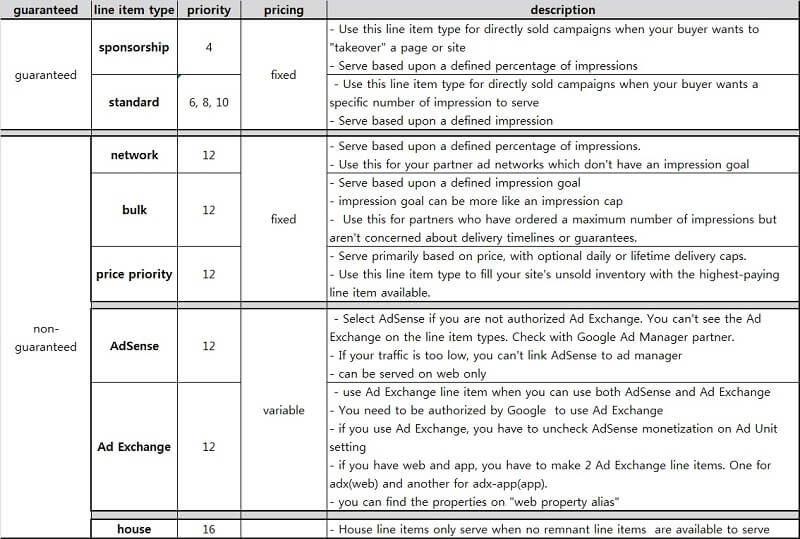
– Line item type and priority : Line item type and priority determine how a line item competes with other line items. Some line items can be guaranteed to serve with high CPM contract. These can be prioritized higher than other line items. The lower number line items are prioritized higher.
– Expected creatives : Select the creatives size. You can choose multiple sizes.
– Labels(optional) : Labels can exclude competition between advertiser or brands.
– Competitive exclusion settings(optional) : You can make ads from competing bands at on the same web page or app at the same time.
– Delivery settings : Select start and end time.
Determine quantity for Sponsorships, Network, House line item types with percentage to achieve.
Determine goal for Standard and Bulk line item types with specific numbers to achieve. Quantity can be impressions or clicks.
Determine limit for Price Priority line item type with specific daily or life time caps of impressions or clicks.
Adjust delivery(optional) : Adjust delivery allow you to fine tune delivery.
Display Creatives :
Only one: Even though multiple creatives are associated with this line item, it shows only one creative per page
One or more (default): It shows multiple creatives.
As many as possible: It Shows creatives in as many ad units as possible on a page
– Rotate creatives :
Even: It rotates creatives evenly.
Optimized (default): It will let the higher creative show more.
Weighted: You can specify the rotation of creatives.
Sequential: Creatives rotate in the order you specify. You must enter a number between 1 and 80.
– Child directed ads : It will prevent interest-based advertising and remarketing ads for ad requests shown to this child user.
– Days and time : Normally don’t use it. You can run ads for specific hours or days. Day and time settings are useful for advertisers that want to reach users at times optimal to their campaign
– Frequency(optional) : Normally don’t use it. Frequency caps limit the number of times specific creatives can serve to an ad unit. Frequency caps improve the ad experience for users of your websites or apps.
– Add targeting : You can show ads based on targeting with many options. I will focus on inventory for now.
– Inventory :
Run of network(RON) : Run-of-network means all inventory in your network is targeted. If you are targeting specific ad unit, change targeting. Run-of-network targeting is useful for serving Google Ad Network(Adsense, Ad Exchange) and house ads. Google Help center explains RON with dynamic allocation line items but I will skip it for later.
Inventory targeting has including and excluding options.
You can targeting ad units or placements.
I recommend you create only one Ad Exchange line item or Adsense(if you are not authorized to use Ad Exchange) and target RON. Then the line item will compete with other line types from non-google ad networks.
Creating one ad exchange line item targeting RON is simple.
– Check inventory : For guaranteed line items(sponsorship and standard) you can forecast future impression. The line item should be running for some period(about one month) to forecast future impression.
The below image is line item types and descriptions.
how to set up creatives in Google Ad Manager
Once you’ve created a line item, you need to add creatives to line item.
You can find a creative tab after you make line item.
There are many ways to add creatives to the line items.
- – Add new creative
- – Add existing creative
- – Bulk upload creatives
- There are many types of creatives and I will show you how to add 3 typical creatives for line items.
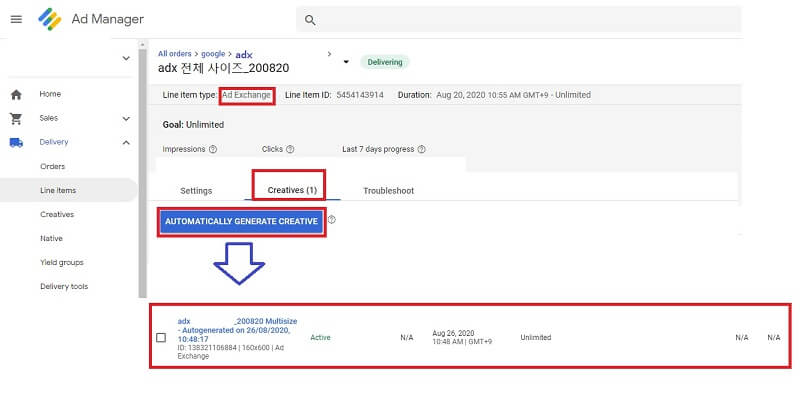
Add creatives to Ad Exchange line item type
Ad Exchange automatically generates creatives with one click
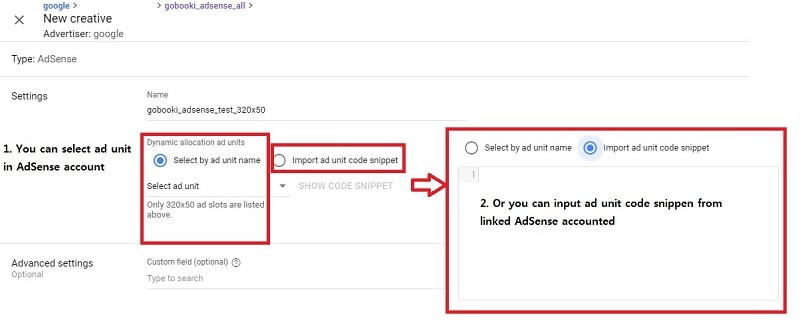
add creatives to an AdSense line item type
Ad units in your AdSense account must be created in advance.
There are two ways to make creative: selecting AdSense’s ad unit on the list and inputting the code in the box.
I recommend selecting ad units on the drop box.
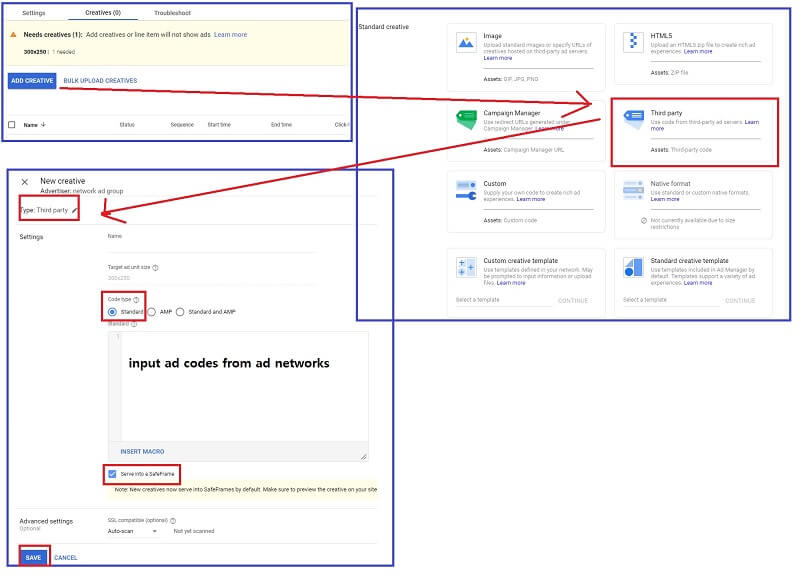
Add creatives to other line item types such as price priority
Select third party creatives for line items like price priority, bulk, standard line items.
Input ad codes from ad network.
The below table file types can be applied to creative types.
| File type | Creative type |
| GIF, JPG, or PNG | Image ads |
| TXT or HTML | Third-party or Campaign Manager ads |
| JS (JavaScript) | Third-party ads |
| Zip bundle | HTML5 ads |
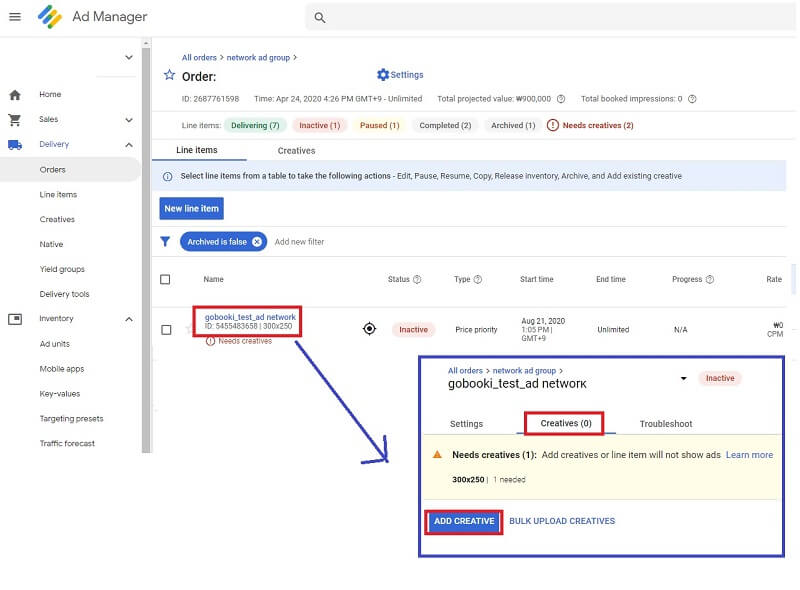
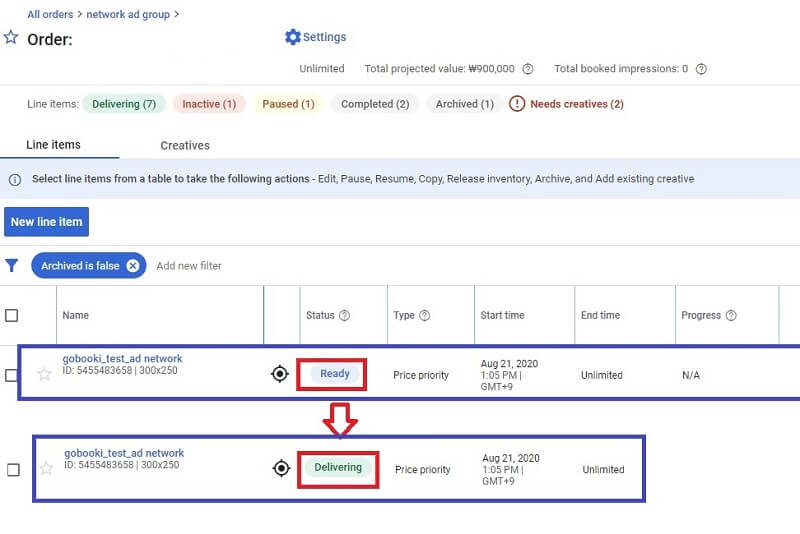
Wait until line item status becomes delivering
Now you just have to wait for the ads to appear on your website.
When ‘ready’ status is shown as below image, it is almost done.
If you have specified a time from the 1st of next month, you may want to change it to today to see if the ad appears as ‘publishing’.
If you check that the status has changed well from Ready to Running as shown below, the advertisement using Google Ad Manager is completed`.
(End)
거북이 미디어 전략 연구소장은 미디어의 온라인 수익화와 전략에 주요 관심을 가지고 있습니다.
저는 Publisher side에서 2015년부터 모바일과 PC 광고를 담당했습니다. 2022년부터 국내 포털을 담당하고 있습니다.
▲ 강의 이력
구글 디지털 성장 프로그램의 광고 워크샵 게스트 스피커(21년 6월)
구글 서치콘솔, 네이버 서치어드바이저, MS 웹마스터 도구 사용법(24년 8월 한국 언론진흥재단 미디어교육원)